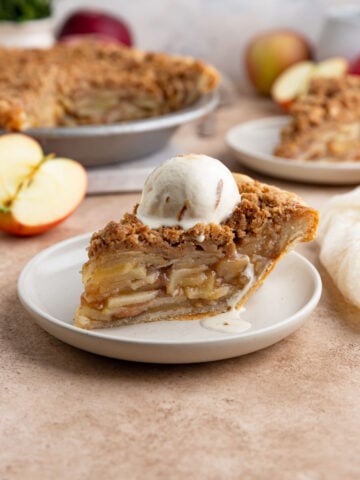
The beauty of this lip-smackingly good homemade Apple Pie recipe is its simplicity. The golden brown flaky pie crust, the layers of apples spiced with cinnamon and nutmeg, and the buttery syrup that forms from the brown sugar and butter. This apple pie is packed with a generous mix of Granny Smith and Golden Delicious apples for the perfect balance of sweet and tart. It’s the perfect pie for fall and winter baking and with this recipe, you'll be amazed at what you can bake from scratch.

Growing up, my mom Julia was the master baker of apple pies. It was my favorite dessert without any competition. I have a vivid memory from school when we learned about the difference between fact and opinion. The teacher asked if everyone loved apple pie, and without hesitation, I marked it as a fact! Turns out I was wrong—that’s an opinion, but come on, who doesn’t love a good old-fashioned apple pie?
I’ve wanted to share a classic apple pie recipe for a long time as a tribute to my mom. She made hundreds of apple pies over her lifetime, and since she stopped baking, I’ve picked up her traditions. This well-tested apple pie recipe is my homage to her, honoring how she taught me to bake and her remarkable skill as a baker.
What Makes This Homemade Apple Pie So Special?
Unforgettable baked apple pies start with a great crust. My foolproof apple pie uses a laminated dough technique for the crust, which creates those perfect flaky layers. The double-crust adds layers of buttery flavor and a tender, golden finish to the pie, while the edges bake up with a delicate crispness and lots of flakiness.
While I go the extra mile with my laminated dough to get those layers, my mom somehow did it effortlessly. She always had that magic pie dough touch! Watching her bake taught me the importance of patience when making pie dough. It’s not something to rush, you have to take your time and trust the process.
This apple pie filling has a tasty sweet-tart combo from the two types of apples: Granny Smith and Golden Delicious. Granny Smith apples are tart and tangy, while the Golden Delicious apples have a sweet mild flavor that balances the tartness of the Granny Smith. They’re coated in an irresistible sweet, cinnamon, syrupy sauce.

I love adding spices to my desserts, but to ensure the flavor of the apples shines through (and following my mom’s example) I only use cinnamon and nutmeg to spice up this pie.
This apple pie recipe is ideal for any occasion! It's delicious, holds its shape beautifully when sliced, and will look stunning on your table, making it especially ideal for special occasions like Thanksgiving. But honestly, fall and winter holidays are a great time to share this pie, not just because a warm homemade apple pie is an all-time crowd-pleaser, but because it evokes feelings of family and tradition.
The memories of coming home from school and the delight of smelling my mom's freshly baked apple pie are the kinds of memories that make this dessert so special to me. I hope that when you make it, this pie creates meaningful memories for you.
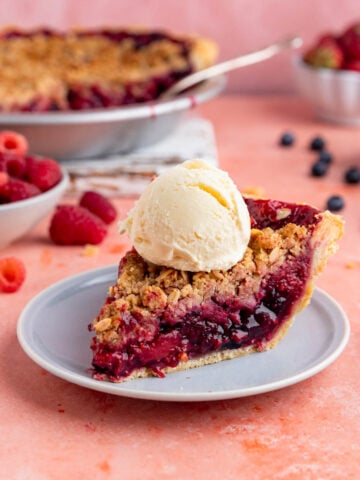
And when you're done with this pie recipe, try my Apple Cranberry Crumble Pie and Mini Apple Galettes recipes.
What Apples Are Best For Apple Pie?
You don’t have to stick to just one type of apple in your pie. If anything, a mixture of apples produces a much more complex and better-tasting apple pie filling. Not all apples are suitable for baking, so choosing the right apples makes all the difference in your pie! Here are a few of my favorites:
- Granny Smith: This classic apple offers a tartness that balances the sweetness of the pie. I consider it one of the best apples to use for pie. They hold their shape during baking, so you'll have lovely slices with tender, not mushy, apples.
- Golden Delicious: These apples offer a classic flavor that's sweet and mellow, perfect for adding a soft texture to your pie and pair well with Granny Smith
- Honeycrisp: Honeycrisp apples are crisp, with a sweet-tart flavor. Like Granny Smith apples they hold their shape when baked.
- Braeburn: These apples have a nice sweet and tart balance, with a hint of spice. They also hold their shape nicely in the oven.
- Jonagold: If you're looking for an apple with a unique flavor, try Jonagold. They have a honeyed sweetness that adds a delicious complexity to your pie.
Ultimately, the best apples for your pie depend on your personal preferences. Feel free to experiment with different combinations to find your perfect blend of sweet and tart!
Key Ingredients for This Traditional Apple Pie
The ingredients for this apple pie are simple, but they all play an important part in creating this memorable apple pie. The apples of course, but the flour helps create the thick sauce, the spices add complexity of flavor, and the sugar adds sweetness, moisture, and flavor.

- All-Butter Pie Dough: Use my foolproof pie dough recipe for the most amazing buttery pie dough. For those wondering, yes, you can make this pie dough in advance. If you’re baking for Thanksgiving, you can make the dough up to two months in advance and freeze it, or prepare it a couple of days ahead and refrigerate it. It’s one less thing to worry about during the holidays!
- Light Brown Sugar: I love brown sugar for apple pie to add that caramel flavor to the filling. If you don't have brown sugar, you can replace it with an equal amount, by weight with granulated sugar
- Ground Spices: I followed my mom's recipe for spices so I only added cinnamon and nutmeg, which allows the apple flavor to shine.
- Unbleached All-Purpose Flour: This helps thicken the apple pie filling. In a lot of my fruit recipes I use tapioca flour to thicken the fruit, but for this pie, I stuck with tradition.
- Lemon Juice: We add freshly squeezed lemon juice to the apple pie filling for a hint of acidity that brightens the flavor of the apples
Full ingredients, measurements, and instructions are in the recipe card at the bottom of this post.
How to Make Double-Crusted Apple Pie
When the pie comes out of the oven you may be tempted to start digging it, but for the best pie possible, be patient, and let it cool completely to room temperature. The filling needs time to finish setting up. If you're making this pie for Thanksgiving, make it the day before.
Step 1: Make the pie dough according to my homemade pie dough recipe. Divide dough into two equal-sized pieces, wrap in plastic wrap, and store in the refrigerator until ready to use.

Step 2: In a medium-sized bowl, whisk together brown sugar, granulated sugar, cinnamon, nutmeg, salt, and flour. Set this aside.

Step 3: Peel the apples. Cut around the core to remove the flesh in 4 large pieces. Lay them flat and slice into 1/8-inch thick pieces.

Step 4: Place the apple slices in a large bowl. The bowl should be large enough to mix the apple slices with the other ingredients without breaking them.
Baking Tip: It's important to evenly slice the apples so they all end up with the same texture as the bake.

Step 5: Sprinkle the dry ingredients over the apples. Use a large spoon to fold the dry ingredients into the apples. Set the filling aside.

Step 6: Use a large spoon to fold the dry ingredients into the apples. Set the filling aside.
Step 7: Generously flour the surface. Roll the dough into a 12-13 inch circle, rotating it a quarter turn after each roll. Add more flour if it sticks.

Step 8: Fold the dough in half, then in half again. Align with the center of the pie pan, and gently unfold it so it covers the pan. Press the dough into the bottom and sides to remove air bubbles. Don't trim the edges yet.

Step 9: Layer the apples in the dough-lined pie plate, filling any gaps. Cut the butter into 6 or 7 pieces and place them evenly over the apples. Set the pie aside while you roll out the second piece of dough.

Step 10: Roll the second piece of dough into a 12-inch circle. Then, unroll it over the apples. Align the edges of the top dough with the bottom dough and trim the edges.

Step 11: Use your thumb and index finger to crimp the edges of the dough. Repeat all the way around the edge of the pie.
Step 12: Chill the pie for 60 minutes. Whisk the egg and water, then brush the top of the pie (avoiding the edges) with the egg wash. Lightly sprinkle granulated sugar over the top.
Step 13: Cut 4 slits into the top of the pie with a sharp knife. These slits allow the steam to escape as the pie bakes.
Step 14: Place the apple pie on a baking sheet. Bake the pie until the filling bubbles through the slits and the crust is golden brown. If the edges get too dark, cover them with a pie shield.

Step 15: Remove the pie from the oven, and place it on a wire rack. Let it cool until room temperature before slicing it.
Baking Tip: If you cut the pie before it has cooled, the filling will run out of the crust. I know it may be hard to wait, but you'll get the best and most impressive results when the pie has cooled completely.
What to Serve with This Apple Pie
The pie is done, you've got that buttery flaky crust, and that sweet-tart apple filling. Now hear me out on this one – it’s a little unconventional, but this apple pie is unbelievable with a slice of medium cheddar cheese on top. I know it sounds pretty strange, but there’s just something about the combination of apples and cheese that works. Warm up the pie, let the cheese melt a bit on top, and it’s magic. Try it, I promise you’ll never go back!
If you’re not into cheese, you can’t go wrong with a classic apple pie slice and a big scoop of vanilla ice cream. If you’re feeling fancy, a drizzle of caramel sauce will add a rich, sweet touch. I'm also working on a salted caramel sauce, which would be another perfect pairing.

How to Store Your Apple Pie
A freshly baked pie with a double crust and crimped edges is a thing of beauty and assuming you are baking in advance or in the rare event you have leftovers, here is how to store the pie.
Room Temperature
- Allow the pie to cool completely to room temperature before storing. This prevents condensation from forming and making the crust soggy.
- Loosely cover the pie with a clean tea towel, a piece of wax paper, or a cake dome. Avoid plastic wrap, because it can trap moisture and make the crust soggy.
- Store the pie for up to 2 days. After that, it's best to refrigerate it.
Refrigerator
- Again, ensure the pie is completely cool before refrigerating.
- Wrap the pie tightly with plastic wrap or aluminum foil to prevent it from drying out or absorbing odors from the refrigerator.
- The pie will stay fresh in the refrigerator for up to 4 days.

More Baked Apple Recipes To Make
If you have a load of apples from your fall apple-picking trips, I have endless apple dessert ideas for how you can use them.
- Apple Cranberry Crumble Pie
- Apple Bread Pudding
- Sweet & Tart Apple Blackberry Crumble
- Apple Crumble with Brown Butter Pecan Topping

Top Tips for Making This Pie
- Chill the dough. If the dough is too warm, when the pie goes into the oven, the butter will melt out of the crust. When that happens the crust will lose some of its flakiness and be a little dense.
- Use a mixture of apples. The combination of different apples creates a complex flavor that's a good balance of sweet and tart.
- Let the pie cool. A freshly baked pie needs time to cool and set. Resist the urge to cut into it right away! Let it rest for at least 3 hours, or even better, overnight.
- Bake the pie on a baking sheet. Bakin the pie on a preheated baking sheet helps conduct heat evenly so you have a golden brown bottom crust.
- Have Fun! Baking should be enjoyable. Don't stress too much about perfection. Embrace the process, and remember that even a slightly imperfect pie can be delicious.
If you make this apple pie please leave a rating and a comment below.
Connect with me on Instagram and tag me @bakesbybrownsugar to share your recipe remake photos.
Like what you see? Click here to subscribe to Bake's by Brown Sugar Baking Newsletter to get free and delicious treats delivered to your inbox.
If You Like This Recipe, Try These Recipes


Want to Save This Recipe?
Enter your email below and I'll send it to your inbox. Plus get new and recommended recipes sent to you every week!
By submitting this form, you consent to receive emails from Bakes by Brown Sugar.

Seriously Good Homemade Apple Pie
Equipment
Ingredients
Apple Filling
- 1-1/2 pounds (682) Granny Smith apples weight of the unpeeled apples
- 1 pound (454 grams) Golden Delicious apples weight of the unpeeled apples
- 3/4 cup (150 grams) packed light brown sugar
- 6 tablespoons (75 grams) granulated sugar
- 1-1/2 teaspoons ground cinnamon
- 1/2 teaspoon ground nutmeg
- 6 tablespoons (48 grams) unbleached all-purpose flour
- 2 tablespoons lemon juice fresh-squeezed
- 1/2 teaspoon kosher salt
- 2 tablespoons (28 grams) unsalted butter, cold
Egg Wash
- 1 large egg
- 1 teaspoon water
- 2 teaspoons granulated sugar
Instructions
Make the Pie Dough
- Make the pie dough according to this recipe. Divide dough into 2 equal sized piece. Wrap each piece in plastic wrap and store for at least 60 minutes and up to 2 days.
Make the Apple Filling
- Whisk together the brown sugar, granulated sugar, ground cinnamon, ground nutmeg, salt, and flour in a medium-sized bowl. Set it aside.
- Peel the apples. With the apples in the upright position and the stem pointing skyward, cut down and around the cores to remove the flesh in 4 lobes (you’ll be left with a square-shaped core). Set the lobes flat-side down and slice the apple lengthwise into 1/8-inch slices, making them as even as possible.
- Place the apples in a large bowl. You want a very large bowl so you have enough room to fold the dry ingredients into the apples without breaking them. As you place the apples in the bowl, sprinkle a teaspoon of lemon juice over the apples until all the lemon juice is used up.
- Sprinkle the dry ingredients over the apples, then use a large spoon to fold the dry ingredients into the apples. It may be easier to use your hands.
- Set the filling aside as you prepare the pie dough.
Prepare the Pie
- Remove the pie dough from the refrigerator. It should be soft enough to roll out, but still cold and firm. If it's hard let it sit at room temperature for 5 minutes.
- Generously flour the work surface. Roll out the dough into a 12-13 inch circle. As you roll out the dough rotate the dough one-quarter turn after each pass of the rolling pin. If at any time the dough sticks, add more flour to the work surface.
- Fold the dough in half and then fold it in half again. Line the point of the dough with the center of the pie pan. Gently unfold the dough so it overhangs the edges of the pan. Gently press the dough against the bottom and sides of the pan to remove any air gaps. Do not trim the dough yet.
- Layer the apples into the dough lined pie plate so there are as few gaps as possible. Once all the apples are in the pan, cut the butter into 6 or 7 pieces and place them over the apples, evenly spread apart. Set the pie aside while you roll out the second piece of dough.
- Remove the second piece of dough from the refrigerator. Similar to the first piece of dough, roll it out to a 12-inch circle. Roll it onto a rolling pin, then unroll it over the apples. Line up the edges of the bottom and top dough as much as possible.
- Trim the dough to 3/4-inch overhang beyond the rim of the pie plate. Press the edges together and then fold the dough under so the edge of the folded dough is even with the edge of the pie plate. Gently press the dough down over the apples.
- Crimp the edges of the dough. I prefer to use the reverse crimp for my pies. To do the reverse crimp press the edge of the dough slightly upward with your index finger. Form a V-shape with the thumb and index fingers on your left hand (if you’re right handed) against the rim of the pie plate with your thumb, creating a flat edge. Gently press your index finger underneath the flat edge, pushing it slightly upwards to create a small outward curve.
- Chill the pie in the refrigerator for 60 minutes.
Bake the Pie
- 20 minutes before you bake the pie, place a half-sheet pan in the oven and preheat the oven to 400°F.
- Whisk the egg and the water together. Remove the pie from the refrigerator. Brush the top of the dough, but not the edges with the egg wash. Sprinkle the sugar over the top of the pie. Cut 4 slits into to the top of the pie with a sharp knife.
- Place the pie in the oven on top of the baking sheet. Bake the pie for 15 minutes, then without opening the oven door, reduce the heat to 350°F and bake the pie for an additional 45-50 minutes until you see the filling bubbling up through one of the slits. The dough will be golden brown. If at any point the edges of the pie become too dark, place a pie shield over the edges.
- Remove the pie from the oven and place it on a wire rack. Let the pie cool to l room temperature, about 3 hours.
How to Store the Pie
- Room TemperatureAllow the pie to cool completely to room temperature before storing. This prevents condensation from forming and making the crust soggy.Loosely cover the pie with a clean tea towel, a piece of wax paper or a cake dome. Avoid plastic wrap, as it can trap moisture and make the crust soggy.This pie can be stored at room temperature for up to 2 days. After that, it's best to refrigerate itRefrigeratorTo refrigerate the pie, wrap it tightly with plastic wrap or aluminum foil to prevent it from drying out or absorbing odors from the refrigerator.The pie will stay fresh in the refrigerator for up to 4 days.
Notes
- Chill the dough. If the dough is too warm, when the pie goes into the oven, the butter will melt out of the crust. When that happens the crust will lose some of its flakiness and be a little dense.
- Use a mixture of apples. The combination of different apples creates a complex flavor that's a good balance of sweet and tart.
- Let the pie cool. A freshly baked pie needs time to cool and set. Resist the urge to cut into it right away! Let it rest for at least 3 hours, or even better, overnight.
- Bake the pie on a baking sheet. Bakin the pie on a preheated baking sheet helps conduct heat evenly so you have a golden brown bottom crust.
- Have Fun! Baking should be enjoyable. Don't stress too much about perfection. Embrace the process, and remember that even a slightly imperfect pie can be delicious.

Debra Waites says
Yummy
Cheryl Norris says
Hi Debra
Thank you! I'm glad you enjoyed.
hopflower says
This recipe is a lot like my mum's. Sometimes half brown sugar and half white were used, and always unsalted butter! Actually, cheese is not as unusual as you may think. Cheddar is the most commonplace cheese used, and is very popular in certain areas of England with an apple pie. I prefer vanilla ice cream or even whipped cream with mine.