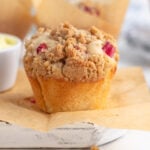
Small Batch Rhubarb Muffins with Brown Sugar Crumble
These rhubarb muffins are soft, moist, and full of tart rhubarb flavor. I love that pop of tartness in each bite. The sour cream keeps the texture tender, and the brown sugar cinnamon crumble adds just the right crunch. It's the perfect recipe for when you’re baking for one or two but want a few leftovers.
Servings: 6 muffins
Calories: 464kcal
Ingredients
Brown Sugar Crumble
- 1/2 cup (63 grams) unbleached all-purpose flour
- 1/4 teaspoon kosher salt
- 3 tablespoons (37 grams) packed brown sugar
- 1/2 teaspoon ground cinnamon
- 3 tablespoons (42 grams) unsalted butter, melted
Rhubarb Muffins
- 1/4 cup (57 grams) unsalted butter melted
- 1 cup (125 grams) unbleached all-purpose flour plus 1 teaspoon for the rhubarb
- 1 teaspoon (4 grams) baking powder
- 1/2 teaspoon kosher salt
- 1/2 teaspoon ground cinnamon
- 6 tablespoons (75 grams) granulated sugar
- 1 large (50 grams) egg room temperature
- 6 tablespoons (90 grams) full-fat sour cream room temperature
- 2 tablespoons (30 ml) whole milk
- 1 teaspoon pure vanilla extract
- 130 grams sliced rhubarb divided
Instructions
- Preheat the oven to 400°F. Add 6 paper liners to a 12-cup muffin pan or use a 6-cup muffin pan. See the notes below are why using a 12-cup muffin pan will help muffins rise higher.
Make the Brown Sugar Crumble
- Melt the butter over low heat and as soon as it’s almost completely melted take it off the heat. Whisk together the flour, sugar, and salt in a small bowl.
- Add the melted butter to the dry ingredients and use a fork to work the butter into the dry ingredients until there are no bits of white flour left, and the streusel forms clumps.
- Place it in the refrigerator while you make the muffin batter.
Make the Muffin Batter
- Melt the butter over medium low heat and cool until it is barely warm, about 90°F.
- Place the all-purpose flour, baking powder, and salt in a bowl and whisk for 30 seconds to combine.
- Crack the egg into a large bowl, add the sugar and whisk until the mixture is lighter in color and doesn’t feel as stiff, about 30 seconds.
- Whisk in the cool melted butter. Next whisk in the sour cream, milk, and vanilla extract. Let the batter sit for about 5 minutes.
- Add 1/2 of the dry ingredients to the batter and fold it with a silicone spatula until incorporated. Add the remaining dry ingredients and mix on low speed until combined. Scrape the sides and bottom of the bowl to ensure all the ingredients are thoroughly combined. Let the batter sit for 10 minutes.
- Toss the 100 grams (1 cup) of chopped rhubarb with 1 teaspoon of flour to co. arb (about 1 cup) and fold the rhubarb into the batter.
Bake the Muffins
- Divide the batter evenly between the 6 muffin cups (about 88 grams per muffin tin). The muffin cups should be full. Take the remaining rhubarb pieces and add about 3 or 4 pieces to the top of each muffin. Next, add about a little more than 1 tablespoon of streusel to each muffin.
- Bake the muffins at 400°F for 5 minutes and then without opening the oven door reduce the temperature to 350°F. Bake the muffins for another 12-15 minutes until the internal temperature registers at about 203°F using an instant-read thermometer.
- Cool the muffins in the pan for 5 minutes, then move the muffins to a wire cooling rack.
Store the Muffins
- The muffins can be stored at room temperature in an airtight container for 2 days and in the refrigerator for up to 4 days. To store the muffins in the refrigerator wrap each one in plastic wrap to keep them from drying out.
- To freeze the muffins wrap each muffin in plastic wrap. Store the muffins in a freezer-safe bag or container. Label and date the bag and freeze for up to 2 months.
- To eat the frozen muffins, thaw them overnight in the refrigerator or at room temperature for about an hour. Warm the muffins in the microwave or in the oven for 5 minutes at 350°F.
Notes
Filling the Muffin Tin: To get tall muffin, space the muffins as seen in the blog post (every other muffin cup) with a muffins . The empty cups allow better air circulation and more even heat around each muffin causing them to riser
Muffins Liners: I used Tulip Cupcake Liners for these muffins so they bake straight and tall. You can use regular cupcake liners, but the muffins will come out with more of a mushroom top.
Muffin Method: The muffin method is where the wet and dry ingredients are mixed separately and then gently combined. The batter is mixed by hand which helps prevent overmixing. In the end your batter should be slightly lumpy.
Weighing Ingredients: My advice is always to weigh ingredients, especially when dealing with smaller amounts like in this recipe. If you don't have a scale, measure the flour by spooning it into a 1-cup measuring cup until it overflows, then use the straight edge of a knife to level it. Do not tap the cup at any time. This method will give you approximately 125 grams.
Nutrition
Calories: 464kcal | Carbohydrates: 69g | Protein: 7g | Fat: 18g | Saturated Fat: 11g | Polyunsaturated Fat: 1g | Monounsaturated Fat: 4g | Trans Fat: 1g | Cholesterol: 47mg | Sodium: 205mg | Potassium: 159mg | Fiber: 2g | Sugar: 23g | Vitamin A: 556IU | Vitamin C: 2mg | Calcium: 56mg | Iron: 3mg